Cloves are a powerful spice packed with health benefits. Here’s an article highlighting their uses and advantages:…..

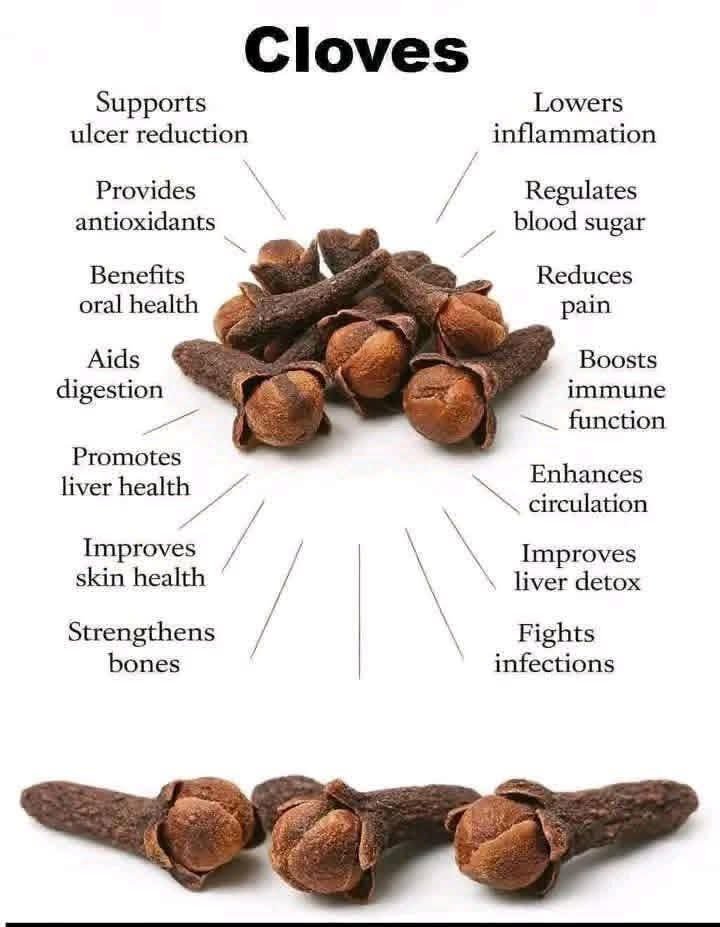
  Cloves: Nature’s Tiny Powerhouse Cloves (Syzygium aromaticum) are dried flower buds of an evergreen tree native to Indonesia. They have been used for centuries in cooking, medicine, and traditional remedies. The image showcases the many health perks of cloves, which include: 1. Supports ulcer reduction – Clove extracts may help protect the stomach lining and reduce ulcer formation. 2. Provides antioxidants – Rich in eugenol, cloves combat oxidative stress and free radicals. 3. Benefits oral health – Eugenol also acts as an antimicrobial, helping fight tooth decay and gum issues. 4. Aids digestion – Cloves can stimulate digestive enzymes and relieve gastrointestinal discomfort. 5. Promotes liver health – Antioxidants support liver function and protect against damage. 6. Improves skin health – Anti-inflammatory properties can soothe skin irritations and promote healing. 7. Strengthens bones – Minerals like manganese in cloves contribute to bone density and strength. 8. Lowers inflammation – Eugenol reduces inflammatory responses in the body. 9. Regulates blood sugar – Some studies suggest cloves may help manage glucose levels. 10. Reduces pain – Used in topical applications for analgesic effects, especially for dental pain. 11. Boosts immune function – Antioxidants and antimicrobial compounds enhance immunity. 12. Enhances circulation – Improves blood flow, supporting overall cardiovascular health. 13. Improves liver detox – Assists the liver in eliminating toxins. 14. Fights infections – Antimicrobial action helps ward off bacterial and fungal infections. Cloves can be used whole, ground, or as an essential oil in teas, dishes, or topical treatments. Moderation is key, as excessive consumption may cause side effects like liver irritation. Want to know more about using cloves in daily cooking or medicinal preparations? 🍃👩‍⚕️

The small aluminum ring on a sausage bar (or snack packaging) is often overlooked, but it serves a clever, practical purpose that most people don’t know about…..

The small aluminum ring on a sausage bar (or snack packaging) is often overlooked, but it serves a clever, practical purpose that most people don’t know about. The Hidden Function of the Aluminum Ring The aluminum (or metal) ring you see crimped around the bottom of many snack tubes—like sausage sticks, cheese snacks, or flavored meat bars—is called a seal clip or tear ring. Its main job is to create an easy‑open mechanism: 1. Seal Integrity: The clip locks the plastic or foil wrapping tightly around the product, keeping it fresh and preventing air or moisture from spoiling the contents. 2. Easy Opening: When you pull the ring, it tears the packaging material at a pre‑scored line, allowing you to open the snack without needing scissors or a knife. The ring acts like a built‑in tab that breaks the seal cleanly. 3. Convenience: It makes the product more user‑friendly, especially for on‑the-go consumption, because you can open it with one hand. Why It’s Not Widely Known Manufacturers often design these features to be subtle, focusing on functionality rather than marketing the mechanism itself. As a result, many consumers only discover the ring’s purpose after using it or seeing it highlighted in tips like the one in your image. Practical Tips – Check the packaging: Look for the scored line near the ring; that’s where the tear will happen. – Reuse: Some people repurpose the metal clips for small DIY projects, though the primary intent is packaging. – Safety: The ring is food‑grade and safe; it’s just a mechanical aid, not a hidden gadget with another function. In short, the aluminum ring is a simple yet smart packaging innovation that ensures freshness and makes opening snack tubes hassle‑free—a little detail that improves everyday convenience. Want to know more about other clever packaging designs or snack‑preservation techniques?

Walnuts: Nature’s Brain‑Boosting Snack…full Article in the comment below….comment 👇👇👇

Walnuts (Juglans regia) are one of the most popular tree nuts, prized for their rich flavor, crunchy texture, and impressive nutritional profile. The photo captures the moment when the hard shell is cracked open to reveal the edible kernel inside, which is commonly eaten raw, roasted, or used in cooking and baking. Nutritional Highlights- Healthy fats: Walnuts are packed with omega‑3 fatty acids, especially alpha‑linolenic acid (ALA), which supports heart health. – Protein & fiber: They provide a good amount of plant protein and dietary fiber, aiding digestion and satiety. – Vitamins & minerals: Rich in vitamin E, folate, magnesium, and antioxidants that combat oxidative stress. Culinary Uses1. Snacking: Enjoy them raw or roasted, seasoned with salt or spices. 2. Baking: Add chopped walnuts to cakes, breads, or cookies for crunch and flavor. 3. Savory dishes: Incorporate them into salads, grain bowls, or sauces for extra texture and nutrition. Storage Tips- Keep walnuts in an airtight container in a cool, dry place to prevent rancidity. – Refrigeration or freezing extends shelf life, especially for large quantities. Health BenefitsRegular consumption of walnuts has been linked to improved brain function, reduced inflammation, and better cardiovascular health. Their unique combination of nutrients makes them a valuable addition to a balanced diet. Would you like tips on how to roast walnuts for maximum flavor, or recipes that feature walnuts as a main ingredient?

Article on the Citrus‑Clove Simmer Pot….full Article in the 1st comment

Making a citrus‑clove simmer pot is a simple, aromatic way to freshen your home naturally. The process involves boiling water with orange peels (or whole oranges) and adding cloves, which release a warm, spicy‑sweet fragrance that can mask odors and create a cozy atmosphere. 1. Ingredients: fresh orange peels or whole oranges, whole cloves, and water. 2. Method: place the oranges/peels in a large pot, fill with water, and bring to a gentle simmer. 3. Add cloves: scoop a spoonful of whole cloves into the simmering liquid, as shown in the photo. The cloves infuse the water with their essential oils. 4. Usage: let the mixture simmer on low heat for 30–60 minutes, replenishing water as needed. The steam spreads the scent throughout the room. Benefits include a natural air freshener, mood‑boosting aroma, and a DIY alternative to chemical sprays. You can customize the blend by adding cinnamon sticks or vanilla extract for extra fragrance. Want to tweak the recipe for a different scent or learn tips for making it last longer?

I found them at my grandma’s and I have no idea what they are Recipe in first comment 👇👇👇

Vintage Thimbles: Tiny Treasures of Craftsmanship & History Thimbles have been humble yet essential tools for seamstresses and tailors for centuries, protecting fingertips from needle pricks while sewing. The ones in the photo display a variety of styles—metallic silver, brass, and textured designs that showcase artisan craftsmanship. Historical Significance- Ancient origins: Early thimbles date back to Roman times, made from leather or bronze. – Medieval craft: In the Middle Ages, thimbles became decorative metal pieces, often engraved with patterns. – Collectible status: Over time, thimbles evolved into collectible items, valued for their design and historical provenance. Types & Materials- Metal thimbles: Commonly steel or brass, with knurled surfaces for grip. – Decorative finishes: Some feature intricate etchings or antique gold tones, turning them into miniature artworks. – Specialty designs: Unique shapes or camouflage patterns (like the green-blue thimble in the bowl) add个性 to collections. Collecting ThimblesCollectors often seek thimbles for their aesthetic value, rarity, or historical connection to specific eras or makers. Vintage pieces like the ones in the bowl can be displayed in decorative dishes, turning everyday sewing tools into charming décor. Caring for Thimbles- Clean metal thimbles with mild soap and dry them to prevent rust. – Store them in protective cases or bowls, as seen in the photo, to avoid scratches. Thimbles may be small, but they carry a rich legacy of craftsmanship, utility, and collectible charm that celebrates the art of sewing and design. Want to know more about how to start a thimble collection or where to find antique thimbles?

Homemade Butter Biscuits with Chocolate Coating: A Simple Sweet Treat..full Article details👇👇👇

The collage shows the step‑by‑step journey of making classic butter biscuits finished with a glossy chocolate dip. Here’s how you can recreate them in your kitchen. Ingredients (for about 20–24 biscuits)- 200 g unsalted butter, softened – 100 g powdered sugar – 1 tsp vanilla extract – 250 g all‑purpose flour – Pinch of salt – 200 g dark or milk chocolate (for coating) – Optional: a little vegetable oil to thin the chocolate Method1. Make the dough: Beat the softened butter with powdered sugar until light and fluffy (like the creamy mix in the top‑left photo). Add vanilla and mix briefly. Sift in flour and salt, then combine to form a smooth dough. 2. Shape the biscuits: Pipe the dough onto a parchment‑lined baking sheet using a star‑tip nozzle, forming the wavy “S” shapes seen in the top‑right image. Keep the sizes uniform for even baking. 3. Bake: Preheat the oven to 180 °C (350 °F). Bake the shaped biscuits for 12–15 minutes, until the edges are just golden. Let them cool completely on a wire rack. 4. Chocolate coating: Melt the chocolate (add a splash of oil if needed for a smoother finish). Dip one half of each cooled biscuit into the melted chocolate, letting excess drip off. 5. Finish: Place the chocolate‑dipped biscuits on parchment to set. Once the chocolate hardens, you’ll have the elegant half‑chocolate, half‑butter biscuits shown in the bottom photo. Tips & Variations- For extra flavor, add a zest of lemon or orange to the dough. – Swap dark chocolate for white chocolate for a different look. – Store the biscuits in an airtight container to keep them crisp. Enjoy your buttery, chocolate‑kissed biscuits with tea or coffee! 🍪✨ Want me to give you a detailed recipe card with exact measurements and timings, or maybe some ideas for flavor twists?

The Simple Pleasure of Sliced Tomato with Salt & Pepper…..more details👇👇👇

  The image shows a classic, no‑frills snack: fresh tomato slices seasoned with just salt and pepper. This humble dish highlights how a few basic ingredients can create an unforgettable flavor experience. Why It Works1. Freshness of the tomato: Ripe tomatoes have natural sweetness and juiciness that form the base of the taste. 2. Salt: Enhances the tomato’s natural flavors and brings out its sweetness while adding a subtle savory note. 3. Pepper: Adds a mild heat and aromatic depth that balances the acidity of the fruit. How to Make It1. Slice a ripe tomato into even rounds, about ¼‑inch thick. 2. Arrange the slices on a plate. 3. Sprinkle a pinch of good quality salt over the slices. 4. Grind fresh black pepper on top to taste. 5. Serve immediately, optionally with a drizzle of olive oil or a basil leaf for extra aroma. Tips for the Best Experience- Use ripe, in‑season tomatoes for maximum juiciness. – Choose sea salt or kosher salt for a cleaner flavor. – Freshly cracked black pepper gives a brighter spice than pre‑ground pepper. – Experiment by adding a dash of herbs like basil or oregano for variation. Cultural TwistIn many cuisines, the tomato‑salt‑pepper combo appears in salads, sandwiches, or as a side dish. It’s a staple in Mediterranean and Latin American cooking, celebrated for its simplicity and freshness. Enjoy this straightforward treat the next time you crave a quick, flavorful bite that lets the natural taste of tomato shine. 🍅✨ Want to know how to pair this snack with other dishes or turn it into a full salad?

Broccoli Breakdown: Keeping Your Green Veggies Vibrant & Crunchy….more details

Why broccoli loses its bright color & texture1. Overcooking – Heat breaks down chlorophyll (the green pigment) and softens the florets. 2. Waterlogging – Excess water makes the vegetable mushy and dulls the color. 3. Acid or alkali exposure – Certain cooking liquids can affect chlorophyll stability. Tips to keep broccoli bright, crisp & fiber‑rich1. Blanch quickly – Drop florets into boiling salted water for 2–3 minutes, then shock them in ice water. This locks in color and texture. 2. Steam instead of boil – Steaming for 4–5 minutes preserves nutrients and keeps the green vivid without waterlogging. 3. Cook in small batches – Avoid crowding the pot; uniform heat ensures even cooking. 4. Finish with a dry heat – After blanching, toss the broccoli in a hot pan with a little oil for 1–2 minutes to add crunch. 5. Avoid alkaline additives – Skip baking soda in the water; it can turn greens olive‑brown. Quick “bright‑broccoli” recipe- Cut broccoli into uniform florets. – Boil water + pinch of salt, add broccoli for 2 min. – Transfer to ice bath, drain well. – Sauté in olive oil, garlic, and a squeeze of lemon for 2 min. Result: crisp, vivid green broccoli that stays intact on your fork and delivers the fiber you need. Want more tips on cooking veggies to keep them colorful and nutritious? 🤔