How to Use the Trunk Release Button…..See details 👇👇👇in the 1st comment

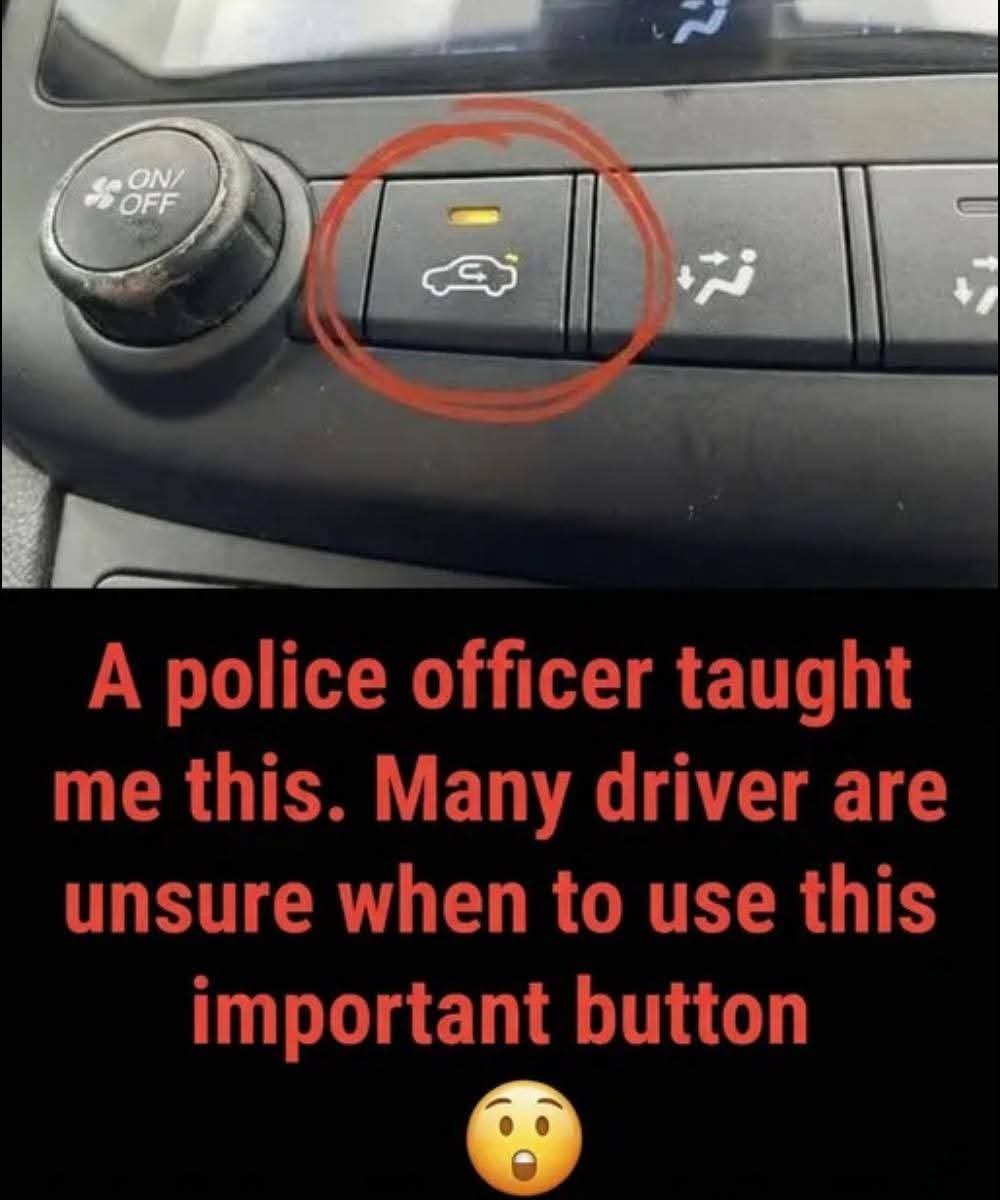
How to Use the Trunk Release Button1. Location: The button is usually marked with a car icon and a downward arrow (as shown in the photo). 2. Operation: Pressing the button unlocks and lifts the trunk lid, allowing access to the storage compartment. 3. Typical situations: – When you need to load or unload items from the trunk. – In emergencies, to quickly access the spare tire or tools. – As a safety feature to prevent unauthorized access (some cars have an electronic lock). Why Drivers Are Unsure About ItMany people confuse this button with other dashboard controls or don’t realize it exists, especially in newer models where electronic features replace traditional key‑operated trunks. A police officer’s tip, as mentioned in the meme, often highlights safety or practical uses of such features that drivers may overlook. Safety Tips- Ensure the vehicle is in park (automatic) or neutral (manual) before operating the trunk. – Check that the trunk is empty or secured when driving to avoid items shifting. – Some vehicles have a separate emergency release handle inside the trunk for safety. Want me to explain any other car dashboard symbols or features you’re unsure about?

19°C is no longer the recommended temperature for your home See the first comment⤵️⤵️⤵️

The Ideal Home Temperature: What Experts Recommend TodayFor years, 19°C (66°F) has been widely quoted as the standard comfortable indoor temperature. Recent research and energy‑efficiency guidelines, however, suggest that the “ideal” setting depends on several factors: 1. Comfort & Health: Most experts now recommend keeping indoor temperatures between 20°C–22°C (68°F–72°F) for general comfort and to support respiratory health, especially during winter. 2. Energy Savings: Lowering the thermostat by just 1°C can cut heating costs by about 5–10%. Experts advise setting the temperature 18°C–20°C when you’re at home and lowering it further (to 15°C–16°C) at night or when the house is empty. 3. Humidity & Ventilation: Maintaining a relative humidity of 40–50% alongside the temperature helps prevent dry air issues. Proper ventilation also influences perceived comfort. 4. Personal Preferences: Age, activity level, and clothing affect individual needs. Older adults or people with health conditions may prefer a warmer environment (21°C–23°C). 5. Seasonal Adjustments: In summer, cooling to 24°C–26°C (75°F–79°F) is often recommended for efficiency and comfort. Bottom LineThe “19°C myth” is being replaced by more nuanced advice: set your thermostat to 20°C–22°C for everyday comfort while employing energy‑saving strategies like programmable timers and layering clothing to stay warm. Want to know how to optimize your specific home heating system for efficiency and comfort?

Rice water is like having gold at home… but few people know how to use it. See the first comment…..Full article 👇 💬

What is rice water?Rice water is the starchy liquid obtained either by soaking raw rice in water for 30–60 minutes or by boiling rice and collecting the leftover broth. It contains vitamins, minerals, and amino acids that leach out of the rice grains. Benefits & uses1. Skin & hair care: Used as a natural toner or rinse, rice water can soften skin, reduce inflammation, and make hair smoother and shinier. 2. Digestive aid: Drinking cooled rice water can soothe stomach upset and provide easy‑to‑digest nutrients. 3. Cooking: It can be reused to cook other grains or soups, adding flavor and nutrients. 4. DIY beauty: Fermented rice water is popular in Asian beauty routines for its antioxidant properties. How to make & use it- Soaking method: Rinse ½ cup rice, soak in 2 cups water for 30 min, strain and collect the liquid. – Boiling method: Cook rice in excess water, strain, and keep the leftover water. – Storage: Keep it refrigerated for up to 3 days; fermenting it (leave at room temp 24–48 hrs) boosts its antioxidant level. Tips to maximize its “gold” value- Experiment with adding herbs or essential oils for enhanced skin benefits. – Use it in homemade face masks mixed with honey or yogurt. – Incorporate it into your daily diet for gut health, especially after illness. Bottom line: rice water is an inexpensive, nutrient‑rich byproduct that can boost beauty routines and health – just learn the simple tricks to unlock its full potential. Want me to dive deeper into a specific use, like a DIY hair rinse recipe? 🍚✨

People Are Spotting a ‘Hidden Detail’ in the Coca-Cola Logo…Details in the first comment 💬👇

Yo, check it—there’s a wild buzz goin’ around about a “hidden detail” in the Coca-Cola logo that folks claim they just spotted after drinkin’ the soda for years. The meme shows a magnifyin’ glass zoomed in on the iconic white script, suggestin’ there’s somethin’ sneaky tucked in the design. Fact is, the Coca-Cola logo is a classic Spencerian script created in the 1880s by Frank M. Robinson, the company’s bookkeeper. The swoosh in the “C” and the flow of the letters are purely aesthetic, meant to give the brand a distinctive, elegant look. There ain’t any secret message or hidden symbol baked into the typography—just good old-fashioned branding craftsmanship. The “hidden detail” hype is basically an internet hoax or an optical illusion playin’ on people’s love for conspiracies. The magnified part highlights the normal curve of the “C” and “o,” makin’ it look like somethin’ special when it’s just the regular design. So, next time you crack open a Coke, enjoy the taste and know the logo’s magic lies in its timeless style, not in some secret code you’ve missed all these years. 🔍🥤 Want me to dig deeper into the history of brand logos or explain how optical illusions trick our eyes? 🤔

Spotlight on the Hallway Lamp: A Styling Statement….Details in the first comment 💬👇

In interior design, even small accessories can define a space’s personality. The pink lamp circled in the photo serves as a focal point in an otherwise simple hallway. Its rounded, terracotta‑styled base paired with a crisp white lampshade adds a touch of vintage charm to the modern black‑framed console table. The placement near the window allows natural light to complement the lamp’s soft glow, creating layered illumination that enhances the ambiance of the entryway. Design-wise, the lamp balances the industrial feel of the metal table legs with a warm, handmade aesthetic, making the hallway feel more inviting. Choosing the right lamp for such a spot can also affect safety and visibility on the stairs leading into the hallway, emphasizing practicality alongside style. When styling a similar space, consider matching the lamp’s color palette with surrounding elements—like the green carpet and white walls in this setting—to achieve cohesive décor. The lamp’s position also draws the eye toward the window, optimizing the visual flow from the entrance to the interior. Would you like tips on selecting lamps that match specific hallway styles, or ideas for arranging accessories around a console table?

The New Jersey Cookie Cutter: A Slice of State Pride in Baking

The New Jersey cookie cutter is a fun kitchen accessory that lets bakers cut dough into the iconic shape of the Garden State. Crafted typically from thin stainless steel, the cutter captures the distinctive silhouette of New Jersey, from its northern tip to the southern cape, including the characteristic “hook” at the top (the northern border) and the “bay” along the Atlantic coast. Uses & Tips1. Baking: Press the cutter into rolled cookie dough to create shaped treats that can be decorated with icing featuring the state flag or local symbols like the Jersey Shore lighthouse. 2. Crafts: The cutter can also be used with clay or fondant for decorative projects themed around geography or American states. 3. Care: Wash the metal cutter with warm, soapy water and dry thoroughly to prevent rust; avoid using it on very thick or hard dough to keep the edges sharp. Cultural TouchState‑shaped cookie cutters like this one are popular in U.S. culinary culture, turning ordinary baking into a celebration of regional identity. For New Jersey enthusiasts, the cutter offers a tasty way to showcase state pride at events like bake sales, school projects, or community festivals. Want to know more about using cookie cutters for themed baking projects, or need tips on designing custom cutters for other states?

I never would have imagined its function was something else entirely… Details in the first comment 💬👇

Yo, check it—here’s a bite‑size article on the “blue‑side” eraser myth that’s been tripping folks up for ages. The “Blue Eraser” MisconceptionMost people think the blue part of a two‑tone eraser (like the Pelican BR 40 shown in the pic) is meant for wiping out pen ink. In reality, the blue section is usually a hard rubber designed to erase pencil marks on harder or rougher paper surfaces, while the red (or orange) side is a softer rubber for regular paper. Neither side is made to erase ink—ink needs a special ink‑eraser or chemical remover, not the ordinary blue‑red combo. Why the Confusion Exists1. Marketing hype – some brands market the blue side as “extra‑strong” or “special” without clarifying it’s still for pencil. 2. Visual cue – the blue color stands out, making people assume it’s for the tougher job (ink). 3. Trial & error – folks try it on ink, see it doesn’t work, and the myth spreads. What Actually Erases Pen Ink- Ink erasers: contain abrasive particles or chemicals that scrape or dissolve ink. – Correction tape/pen: covers ink with white pigment instead of removing it. – Solvents: like acetone or specific ink removers (use with caution on paper). Bottom LineThe blue part of a regular eraser is just a tougher pencil eraser, not a magic ink‑remover. If you need to fix pen mistakes, grab an actual ink eraser or correction tool. You want me to expand this into a full‑length feature, or do you need a quick tip on choosing the right eraser for your work? 🤔

What castor oil isCastor oil is a vegetable oil pressed from the seeds of the Ricinus communis plant. It contains ricinoleic acid, which gives it moisturizing and anti‑inflammatory properties…Full article 👇 💬

Reported effects of using castor oil on skin after 501. Moisturization: The oil can deeply hydrate the skin, making it feel softer and smoother. 2. Reduced appearance of wrinkles: Some users claim it helps minimize fine lines by improving skin elasticity. 3. Skin irritation risk: Applying undiluted castor oil may cause allergic reactions or clog pores in sensitive skin. 4. Limited scientific evidence: Most benefits are based on anecdotal reports; clinical studies are scarce. How to use castor oil safely for 7‑day trial- Dilute castor oil with a carrier oil (e.g., jojoba or almond oil) in a 1:2 ratio. – Apply a small amount to a patch of skin first to check for irritation. – Massage gently onto clean skin, focusing on areas with wrinkles or dryness. – Avoid applying near the eyes or broken skin. Things to consider- Individual results vary depending on skin type and age. – Consult a dermatologist before starting any new skin regimen, especially after 50, to address specific concerns like age‑related skin changes. – Combine with a balanced diet and proper skincare routine for better overall effects. Want to know more about natural anti‑aging skin care options or need tips for choosing the right products after 50?

Don’t Toss Those Chipped Plates – Give Them a Fresh New Life!

Old, chipped plates can feel like junk, but with a little creativity they turn into awesome, reusable treasures. Instead of throwing them away, try these brilliant upcycling ideas: 1. Garden Decor: Break the plates into shards and embed them in mosaic garden pots or stepping stones for a colorful, vintage look. 2. Wall Art: Arrange whole or broken plates in a frame or directly on a wall to create unique mosaic artwork or decorative plaques. 3. Serving Trays: Glue a few plates together or use a single large plate as a rustic serving tray for snacks or desserts. 4. Craft Projects: Cut out shapes from the plates for DIY jewelry, coasters, or decorative magnets. 5. Kids’ Crafts: Use the plates for painting or collage projects with children, teaching reuse and creativity. Tips for safe reuse: – Smooth any sharp edges with sandpaper. – Check that the glaze is food‑safe if you’ll use them for eating or serving. – Clean thoroughly before repurposing. Turning chipped plates into something useful not only saves money but also reduces waste and sparks imagination. So next time you spot a cracked dish, think upcycle instead of trash! 🎨🌿 Want me to dive deeper into any specific upcycling technique or give step‑by‑step instructions for one of these ideas?

Most people throw these away. 10 smart ways to reuse old eyeglass cases. Full article 👇 💬

10 Smart Ways to Reuse Old Eyeglass Cases Eyeglass cases are tiny, sturdy containers that most folks toss in the trash once the glasses are gone. But these little boxes have a lot of hidden potential. Here are 10 clever ways to give your old eyeglass cases a second life: 1. Mini storage for jewelry – stash earrings, rings, or tiny necklaces in the soft‑lined cases to keep them from getting scratched. 2. Travel pill box – use the case to hold a few daily tablets or vitamins when you’re on the go; the snap‑close lid keeps them secure. 3. Craft supply organizer – pack beads, buttons, or sewing needles in separate cases to sort your DIY materials. 4. Phone or earbud protector – slip a small phone or earbuds into a case for protection against scratches in your bag. 5. Seed storage – gardeners can keep tiny seed packets in the cases, labeling each for easy identification. 6. Emergency nail‑care kit – store a nail file, clipper, and polish in a case for quick touch‑ups. 7. Mini makeup palette – use the case to hold lipsticks, blush samples, or eyeshadow swatches for on‑the‑go touch‑ups. 8. Tech accessory pouch – protect USB sticks, SD cards, or small cables in the case to prevent damage. 9. Kids’ treasure chest – let children use the cases to store small collectibles like stickers or figurines. 10. Gift packaging – wrap a tiny gift inside a decorative case for a personalized, reusable present box. Tips for Reusing Cases Effectively- Clean them first – wipe the inside with a damp cloth and let them dry before repurposing. – Label the cases – add stickers or write on the lid to identify what’s inside, especially for storage uses. – Mix & match – combine two small cases to create a double‑compartment organizer for better sorting. By thinking outside the box (literally), you can turn ordinary eyeglass cases into useful, stylish accessories for everyday life. Give those “throw‑away” cases a new mission and reduce waste at the same time! Want me to expand on any of these reuse ideas or provide DIY decoration tips for the cases?