Clove Foot Soak: A Simple Home Remedy for Foot Care…..

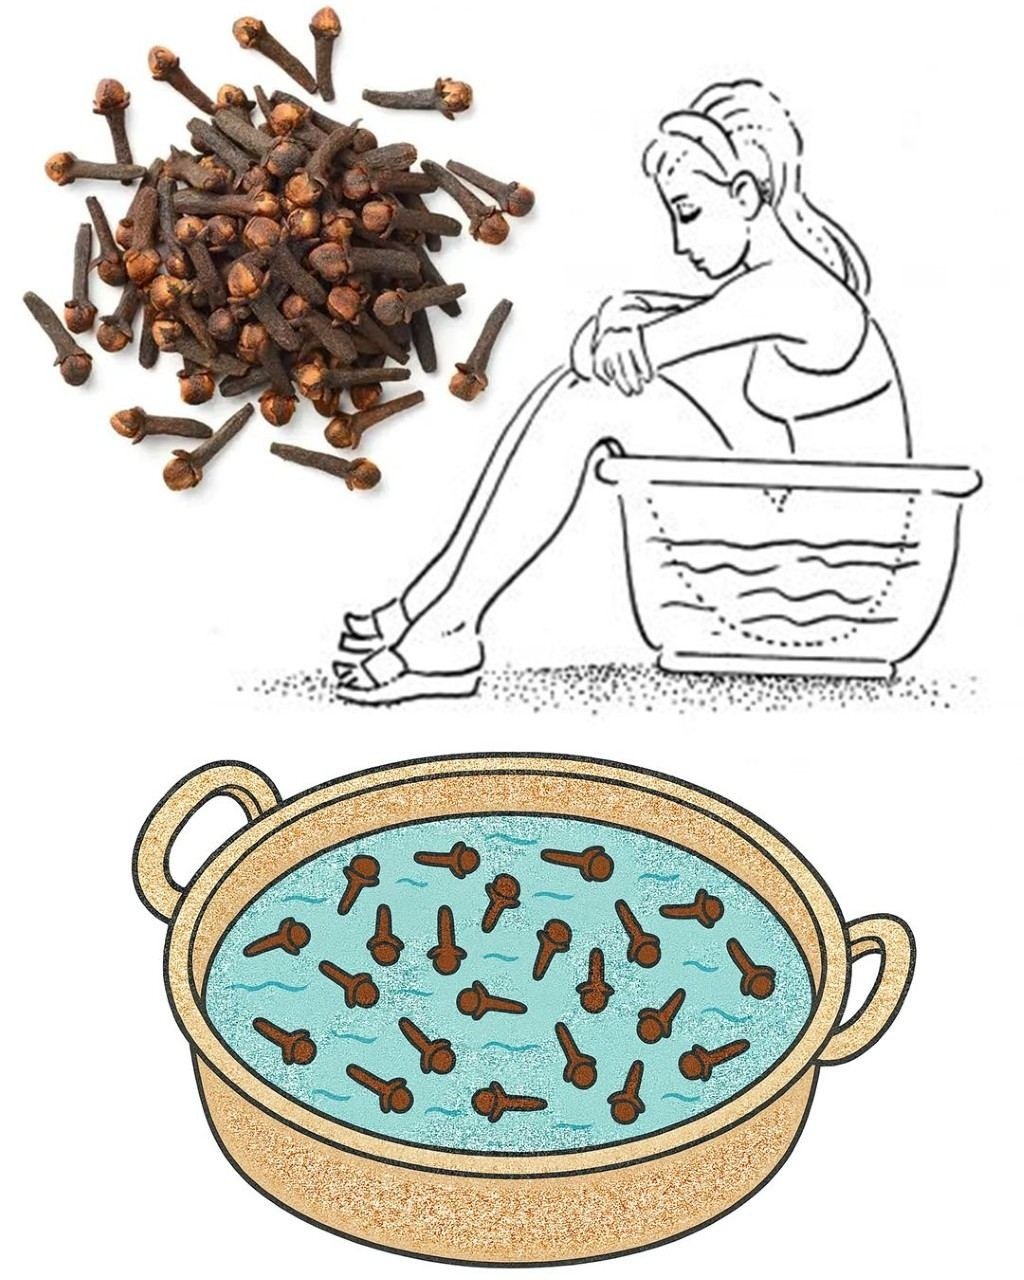
The image shows three elements: a pile of dried cloves, a sketch of a woman soaking her foot in a bucket of water with cloves, and an illustrated pot filled with water and floating cloves. Here’s a concise article inspired by the picture: Clove Foot Soak: A Simple Home Remedy for Foot Care Cloves (Syzygium aromaticum) are aromatic dried flower buds commonly used in cooking and traditional medicine. The image depicts a traditional foot‑care practice where cloves are added to warm water for a soothing soak. How It Works1. Antiseptic properties: Clove contains eugenol, which has antibacterial and antifungal effects that can help cleanse the skin. 2. Relaxation: The warm water and clove aroma create a calming experience, easing muscle tension in the feet. 3. Odor control: Cloves can neutralize foot odor, leaving a pleasant scent. Preparing a Clove Foot Bath- Take a handful of whole cloves (as shown in the top‑left of the image). – Add them to a bucket or basin of hot water (illustrated in the top‑right sketch). – Soak the feet for 10–15 minutes, allowing the cloves to release their oils. – Alternatively, boil cloves in water and use the infusion for a foot soak (bottom illustration). Tips & Precautions- Test water temperature to avoid burns. – Limit soaking time if you have sensitive skin. – Consult a healthcare professional for severe foot conditions; the soak is a complementary, not a primary, treatment. The practice is popular in home remedies for refreshing tired feet and enjoying the natural fragrance of clove

Say Goodbye to Belly Fat: 3-Day Diet Plan to Reduce Visceral Fat…

The image shows a striking before-and-after comparison of a woman’s midsection, highlighting a slimmer waistline. Here’s a concise article based on the visual, focusing on a practical 3-day diet plan to tackle visceral fat. Why Target Belly Fat?Visceral fat, the fat around your organs, increases risks of diabetes, heart disease, and more. A combination of diet, exercise, and lifestyle changes can help reduce it. 3-Day Diet Plan to Jumpstart Fat LossDay 1: – Breakfast: Green smoothie (spinach, green apple, almond milk, chia seeds). – Lunch: Grilled chicken salad with leafy greens, cucumbers, tomatoes, avocado. – Dinner: Baked salmon with quinoa and steamed broccoli. – Snacks: 1 apple, handful of almonds. Day 2: – Breakfast: Oatmeal with berries and a drizzle of honey. – Lunch: Turkey lettuce wraps with avocado, tomato. – Dinner: Stir-fry tofu with spinach, bell peppers, brown rice. – Snacks: Greek yogurt with flaxseeds, cucumber slices. Day 3: – Breakfast: Scrambled eggs with spinach, whole-grain toast. – Lunch: Lentil soup with a side salad. – Dinner: Grilled shrimp with zucchini noodles, cherry tomatoes. – Snacks: Carrot sticks with hummus, a pear. Key Principles1. Hydrate: Drink 8–10 glasses of water daily. 2. Avoid: Sugary drinks, processed foods, refined carbs. 3. Boost Fiber: Include veggies, fruits, whole grains. 4. Portion Control: Eat smaller, frequent meals. 5. Move More: Add 30 minutes of cardio (brisk walking, cycling). Beyond Diet- Stress less: Try yoga or meditation. – Sleep well: Aim for 7–8 hours nightly. – Consult a pro: Before making major changes, especially if you have health conditions.

Say Goodbye to Belly Fat: 3-Day Diet Plan to Reduce Visceral Fat…..

The image shows a striking before-and-after comparison of a woman’s midsection, highlighting a slimmer waistline. Here’s a concise article based on the visual, focusing on a practical 3-day diet plan to tackle visceral fat. Why Target Belly Fat?Visceral fat, the fat around your organs, increases risks of diabetes, heart disease, and more. A combination of diet, exercise, and lifestyle changes can help reduce it. 3-Day Diet Plan to Jumpstart Fat LossDay 1: – Breakfast: Green smoothie (spinach, green apple, almond milk, chia seeds). – Lunch: Grilled chicken salad with leafy greens, cucumbers, tomatoes, avocado. – Dinner: Baked salmon with quinoa and steamed broccoli. – Snacks: 1 apple, handful of almonds. Day 2: – Breakfast: Oatmeal with berries and a drizzle of honey. – Lunch: Turkey lettuce wraps with avocado, tomato. – Dinner: Stir-fry tofu with spinach, bell peppers, brown rice. – Snacks: Greek yogurt with flaxseeds, cucumber slices. Day 3: – Breakfast: Scrambled eggs with spinach, whole-grain toast. – Lunch: Lentil soup with a side salad. – Dinner: Grilled shrimp with zucchini noodles, cherry tomatoes. – Snacks: Carrot sticks with hummus, a pear. Key Principles1. Hydrate: Drink 8–10 glasses of water daily. 2. Avoid: Sugary drinks, processed foods, refined carbs. 3. Boost Fiber: Include veggies, fruits, whole grains. 4. Portion Control: Eat smaller, frequent meals. 5. Move More: Add 30 minutes of cardio (brisk walking, cycling). Beyond Diet- Stress less: Try yoga or meditation. – Sleep well: Aim for 7–8 hours nightly. – Consult a pro: Before making major changes, especially if you have health conditions.

SENIORS, GET LEGS STRONG AS STEEL – CONSUME THIS TO RECOVER BONES…..

The image shows an eye‑catching health promotion that links eating a specific seed (likely buckwheat or hemp seeds) to stronger bones and joint recovery, especially for seniors. Here’s a concise article that explains the idea behind the visual message. The ClaimThe ad suggests that consuming the pictured seeds can help seniors rebuild weak, porous bones (often associated with osteoporosis) and strengthen leg joints, making them “as strong as steel.” The arrows indicate a transformation from brittle, osteoporotic bone to healthy bone and from a painful spine to relief after eating the seeds. What the Seeds OfferThe seeds shown are rich in nutrients essential for bone health: 1. Protein – supports tissue repair and muscle strength, which indirectly protects bones. 2. Calcium & Magnesium – key minerals for bone mineralization. 3. Omega‑3 fatty acids (in some seeds like hemp) – may reduce inflammation around joints. 4. Phosphorus & Vitamin E – aid in bone metabolism and protection against oxidative stress. Practical Tips for Seniors- Include the seeds in daily meals: sprinkle on oatmeal, blend into smoothies, or add to salads. – Balance with other nutrients: combine with calcium‑rich foods (dairy or fortified alternatives) and vitamin D for better absorption. – Consult a professional: seniors should check with a doctor or dietitian before making major dietary changes, especially if they have existing bone conditions. – Exercise: weight‑bearing activities (walking, light resistance training) are also crucial for bone strength. Bottom LineThe seeds promoted in the image can be a beneficial part of a bone‑health diet due to their nutrient profile. However, strong bones depend on a mix of proper nutrition, appropriate exercise, and medical guidance, not a single food alone.

My grandma’s 2‑minute dust‑and‑hair hack that needs zero effort – here’s the scoop!….

The photo shows fluffy gray dust‑and‑hair balls scattered on a wooden floor, presented as the “result” of a grandmother‑approved trick to clear house dust and hair in just two minutes with no work at all. In reality, the image is a clever meme that plays on the idea of a magical shortcut for cleaning. How the “hack” is usually explained (the meme version)1. The claim: Grandma says you can gather dust & hair into neat piles in 2 minutes without lifting a finger. 2. The visual: The photo shows the dust/hair already clumped, implying the “magic” method worked. 3. The twist: There’s no actual technique given – it’s a joke about wishing cleaning were effortless. What really works (practical tips for quick dust & hair removal)- Dry microfiber cloth or mop: Swipe the floor to attract dust and hair into piles, then sweep or vacuum. – Static‑charged duster: A fabric or rubber duster creates static that pulls particles together for easy removal. – Vacuum with a brush attachment: Quickly run it over floors to suck up hair and dust. – Dust‑busting spray: A light mist of water or anti‑static spray can make particles cling together for easier sweeping. Bottom lineThe meme is a fun reminder that shortcuts sound great but real cleaning still needs a simple tool or a quick sweep. If you want a genuine fast method, grab a microfiber mop or a good vacuum – you’ll get the house spotless in minutes with minimal effort.

Prevent Nighttime Leg Cramps: A Practical Guide……

Nighttime leg cramps, those sudden, painful muscle contractions that strike while you’re trying to sleep, can be a real nuisance. They usually hit the calf muscles, making it feel like your leg is locked in a tight knot. Below is a straightforward guide on why they happen and what you can do to stop them from ruining your night. Why Nighttime Leg Cramps Occur1. Dehydration & Electrolyte imbalance – not drinking enough water or lacking minerals like potassium, magnesium, or calcium can trigger cramps. 2. Muscle fatigue – overexerting your legs during the day leaves them prone to spasms at night. 3. Poor circulation – restricted blood flow can cause muscles to contract unexpectedly. 4. Medications – some diuretics or statins may increase cramp risk. 5. Nutrient deficiencies – low levels of magnesium or vitamin B can affect muscle function. Prevention Tips- Stay hydrated: drink water regularly throughout the day and sip before bed. – Balance electrolytes: add potassium‑rich foods (bananas, oranges) and magnesium sources (nuts, leafy greens) to your diet. – Stretch before bed: focus on calf and hamstring stretches to relax the muscles. – Proper footwear: wear supportive shoes during the day to reduce muscle strain. – Gentle exercise: regular low‑impact activity like walking improves circulation. – Electrolyte drinks: a light sports drink or magnesium supplement can help if you’re deficient. – Adjust sleeping position: keep your feet flexed (toes toward your shins) to prevent shortening of calf muscles. What to Do When a Cramp Hits1. Stretch the muscle: straighten your leg and pull your toes toward your shin. 2. Massage: gently rub the cramped area to relax the fibers. 3. Apply heat or cold: a warm towel or ice pack can ease the pain. 4. Move around: walking a few steps can reset the muscle. When to Seek HelpFrequent, severe cramps may signal an underlying issue like a nerve problem or circulatory disease. If cramps are persistent, consult a healthcare professional for evaluation.

The reasons why children don’t visit their parents…….

A poignant image of an elderly woman gazing out of a window, hand resting on her cheek, captures the quiet sorrow of feeling forgotten by her children. The photo serves as a visual prompt to explore the complex factors that drive a growing gap between adult children and their aging parents in today’s world. Why kids stop visiting1. Busy lives & work pressure – Modern careers and demanding schedules leave little time for regular visits, especially when children live far from their hometown. 2. Geographic distance – Migration for education or jobs often separates families, making spontaneous visits impractical or costly. 3. Technology replacing physical presence – Video calls and social media give the illusion of connection, reducing the urge to meet in person. 4. Family conflicts – Unresolved disputes or differing values can create emotional distance, discouraging visits. 5. Financial constraints – Travel expenses or lack of resources may limit the ability to visit aging parents regularly. 6. Changing family structures – Smaller nuclear families and shifting responsibilities can blur the sense of obligation to elderly parents. 7. Health & mobility issues – Parents’ health problems may make visits emotionally difficult for children, or the elderly may feel embarrassed about their condition. Impact on parentsFeeling neglected can lead to loneliness, depression, and a decline in mental health for seniors, who often cherish personal interaction over digital communication. Bridging the gap- Prioritize quality time: Even short, regular visits can mean the world to parents. – Plan family gatherings: Organize reunions or celebrations that make visits enjoyable for both generations. – Open communication: Addressing misunderstandings can remove emotional barriers to visiting. – Seek support: Community or elder-care services can ease logistical challenges of visiting. The image reminds us that while life’s demands can pull families apart, conscious effort and empathy can rebuild the bond between children and their aging parents, ensuring they feel loved and remembered.

What are those ‘white stones’ that appear in the mouth and cause bad breath?

Learn how to eliminate these unwanted, smelly little stones. Have you ever coughed and noticed a small white ball, with a strong and unpleasant smell, coming out of your throat? This phenomenon is more common than it seems. Share on Telegram Many people live with these small formations without even knowing what they are. Called tonsil stones, or tonsilloliths, these stones can be uncomfortable and cause persistent bad breath. First of all, it’s worth saying that tonsil stones are harmless at first, causing only bad odor as discomfort. However, if they are not removed or appear too frequently, they can trigger bigger problems, such as tonsillitis and other types of inflammation. Take the opportunity to read also General Take this natural remedy of honey, cinnamon and ginger and be impressed with the results General Bad breath is cured with zedoary tea Want to know more about this subject? Check out the details below.

SIGNS OF FATTY LIVER – WHAT YOUR BODY IS TRYING TO TELL YOU….

The image you shared highlights the warning signs of fatty liver disease, a condition where excess fat builds up in the liver cells. Here’s a concise article breaking down the visuals and the message they convey: What the picture shows1. Upper left panel: A person’s back with a glowing yellow-red liver outline and an arrow pointing to it, labeled “SIGNS OF FATTY LIVER!” The red glow indicates liver inflammation or damage. 2. Upper right panel: A person touching their neck/throat area with an orange highlighted thyroid/liver shape and the warning “NEVER IGNORE THEM!!” This suggests that symptoms can appear in the neck region (e.g., swelling or discomfort). 3. Bottom panel: Three illustrations – a silhouette with a yellow gallstone and red arrow (linking liver issues to bile problems), a close-up of a fatty liver with a yellow spot (fat accumulation), and legs with muscle/nerve pain indicating possible complications like weakness or cramping due to liver dysfunction. Key signs of fatty liver to watch for- Upper abdominal pain or discomfort (right side, near the liver). – Neck or throat swelling that may signal metabolic or hormonal imbalance linked to liver stress. – Fatigue & muscle weakness – the liver’s inability to detoxify can affect energy and muscles. – Visible liver enlargement or fat deposits (yellow spots) in the organ. Why you shouldn’t ignore these signsFatty liver can progress to steatosis, inflammation (steatohepatitis), fibrosis, or even cirrhosis if untreated. Early detection lets you make lifestyle changes – like improving diet, increasing physical activity, and reducing alcohol intake – that can reverse or halt the condition. What to do nextIf you experience any of the symptoms shown, consult a healthcare professional for: – Blood tests (liver function tests). – Imaging (ultrasound or FibroScan) to assess liver fat. – Personalized advice on diet and exercise. Bottom line: The image urges you to recognize the body’s warning signals of fatty liver and act promptly to protect your liver health.

My nana knew what she was doing. 𝗙𝘂𝗹𝗹 𝗮𝗿𝘁𝗶𝗰𝗹𝗲 👇 💬

The image shows a simple illustration of a classic beauty tip many people have heard from their grandmothers: a gentle, low-effort way to remove unwanted facial hair—especially on the upper lip—using natural, easy-to-find ingredients. While modern skincare offers many solutions, traditional home remedies are still loved for being gentle, affordable, and effective for sensitive skin. The Idea Behind the Trick Facial hair removal doesn’t always have to involve painful waxing, threading, or expensive treatments. This “nana-approved” remedy focuses on softening and loosening the hair so it can be removed with minimal irritation. The cotton swab shown in the image suggests a method that requires precision, cleanliness, and zero complicated tools. How the Remedy Typically Works Although the picture doesn’t reveal the exact ingredients, most traditional facial hair–reducing remedies follow a similar method: 1. Apply a Gentle Paste Grandmothers often used natural combinations such as: Turmeric + milk Sugar + lemon Gram flour (besan) + yogurt Baking soda mixed with water (used sparingly for sensitive skin) These mixtures help exfoliate the skin, loosen fine hair, and reduce regrowth over time. 2. Use a Cotton Swab for Application The cotton swab shown in the image highlights: Controlled application Prevention of mess Targeted use on areas like the upper lip, chin, or sides of the face A thin layer is usually applied directly to the hair-prone area. 3. Allow It to Dry Most natural pastes need a few minutes to dry. This helps them grip fine hair and dead skin cells, making removal easier. 4. Gently Remove or Rinse Depending on the recipe, the paste is either: Rubbed off gently in circular motions Peeled off once dry Rinsed with warm water This helps the hair come away without pain. Why People Love This Trick Painless compared to waxing Low effort—just mix, apply, and rinse Gentle on skin, making it suitable for sensitive areas Natural ingredients, reducing the risk of harsh reactions Affordable, using items easily found at home A Timeless Beauty Secret The picture reflects a tradition passed down through generations: using simple, natural methods to maintain smooth, glowing skin. While modern products are useful, sometimes the easiest solutions are the ones our elders trusted the most.